Color Me Home Episode 4: Curb Appeal on a Budget, 2

This week, Betsy and Dan continue their discussion regarding simple exterior projects designed to help you increase the curb appeal of your home without breaking the bank!

Episode Outline

  • Is Your Front Porch Inviting? (1:06)
  • What Does Your Landscaping Say About Your Home? (17:10)
  • Have You Ever Considered Painting the Whole House? (23:50)
  • A Simple Cleanup Can Make a Tremendous Difference! (28:14)

Haint Blue

One of the interesting discussions we had in this episode revolved around an old tradition in the South where porch ceilings were painted blue. There were a number of reasons why people did this, but one of them revolved around the ability of blue paint to ward off or deter spirits, or “haints”. You can read one of the articles we referenced right here!

The Porch on the Grand Hotel (or, Dan’s Wrong Again).

grand_hotel_webDuring the discussion about porches, Dan suggested that the famous porch on the Grand Hotel on Mackinac Island was painted blue. He was adamant. Betsy was, of course, skeptical. She offered to check with a “reliable source”, who turns out to be her father. Who turns out to be the supplier of much of the paint that’s used on the Island. Who confirmed that Dan was indeed wrong. The actual color on the huge covered porch of the Grand Hotel is called “Grand Hotel Porch Green”.

Now, technically, it’s a bluish green. But it’s also, technically, called “green”. So, Dan (though he was really close and would get an A for effort if he would accept a grade based solely on effort) was wrong. Betsy, as seems to be her tendency, was right. Oh well, tomorrow’s a new day…

Vinyl Safe Colors

We mentioned this in our previous episode as well, but here’s the link to Benjamin Moore’s Vinyl Safe Colors. Check out the full palette!vinyl_safe_colors_revive4

Painting Your Vinyl Siding

Painting your vinyl siding isn’t typically a project we’d consider “low-budget”. Yet, in the grand scheme of things, it really is. Here’s why: painting the vinyl siding of your home will produce a remarkable change. In fact, not many outdoor projects (if any!) are going to produce as profound a change in the curb appeal of your home. So, the project produces amazing results. And to get those amazing results, you typically only have to spend anywhere from $300 – $600 on paint. Add some supplies and figure in your time to do the work and you’re still talking about a relatively low expenditure to produce the biggest change possible without remodeling or re-siding your home. So, relatively speaking, it’s inexpensive when you consider the results!

And, it’s not a difficult project. We’ll go into greater detail on a future blog post, but for now the basics are these:

CLEAN THE SIDING: Before you apply any paint, the siding needs to be cleaned and free from any surface contaminants. The paint you will later use bonds to the surface of the vinyl. If that surface is not clean and ready for paint, you can end up with the paint bonding to whatever contaminant was there (dust, dirt, etc). So, make sure you clean the siding. We recommend a cleaner called Jomax. It’s designed to clean vinyl siding and if you use this in conjunction with a scrub brush and a power washer, you’ll be able to get the dust, mildew, and any other surface contaminants off the siding to make it ready for paint.

PICK YOUR PAINT: Once the siding’s ready for paint, it’s time to get the paint! We recommend Benjamin Moore’s Regal Select Revive. Revive provides excellent color retention, is resistant to mildew and can be applied in temperatures as low as 40 degrees Fahrenheit. It’s designed specifically for vinyl siding and comes in a wide palette of vinyl-safe colors. As we mentioned above, to avoid warping caused by colors that absorb heat, be sure to select vinyl safe colors for your project!

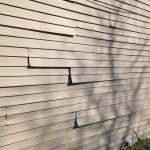
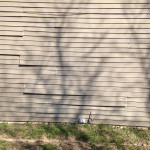
Below, we have a gallery showing you why you want to use vinyl safe colors! In the photos, the paint on the vinyl was simply regular exterior paint and a vinyl safe color wasn’t chosen. The new color was darker than the original vinyl and, in the sun, heated up so much that the actual vinyl siding warped, creating a problem that can only be fixed by replacing the siding. The lesson? Always choose vinyl safe colors!

APPLY IT and ENJOY: After cleaning and picking your paint (and vinyl safe color!) all that’s left is to do the work. Apply the paint on the cool side of the house, working out of direct sunlight. You can use a roller (we have various sizes), a paint pad, a brush (generally just for trim work), or even a sprayer (if you can safely do that without having overspray drift throughout your neighborhood!). Painting the whole house is labor intensive. It will take you some time and it’s definitely a work out (you’re going up and down ladders all the time!). But, the good news is that once you’re done, you’ll be able to enjoy the benefits for many years to come!

If you decide to tackle a project like this, stop out at any RepcoLite, Port City Paints, or Snyder Paints location and let us give you the full rundown regarding method and tools!

A Simple Cleanup

jomax_400We ended this episode discussing the importance (and ease!) of simply doing a little cleanup around your house. Sure, this is pretty obvious, but we wanted to highlight a couple things that might make this easier for you. First off, as we mentioned above, when it comes to cleaning your vinyl siding, we recommend Jomax. It’s a concentrate you mix with water and it’s designed to help you easily remove tough dirt and stains. Mix it with a little bleach and it will kill mold and mildew fast! (Just watch out for your plants and landscaping . . . or you’ll be in big trouble. Remember: we warned you!)

A second note we wanted to convey is that RepcoLite, Port City Paints, and Snyder Paints all rent out power washers. So if you don’t own one or have a friend or neighbor with one, be sure to call your nearest store and reserve one! It speeds up the cleaning process dramatically and will help you get your house looking beautiful in no time!


Color Me Home Episode 3: Curb Appeal on a Budget, 1

This week, in honor of the beautiful weather we all experienced over Spring Break, Betsy and Dan discuss some simple exterior projects that will help you increase the curb appeal of your home without breaking the bank!

Episode Outline

  • Front Doors (1:55)
  • What If I’ve Got a Storm Door? (7:34)
  • Careful With Your Color, Though! (12:12)
  • Garage Doors (12:39)
  • Shutters (13:40)
  • Vinyl Safe Paint and Colors (15:20)
  • How to Paint Your Shutters (18:20)
  • A Quick Miracle Fix to Revive Faded Shutters (21:51)
  • Mailboxes (25:40)

Before and After Homes with Shutters!

As we mentioned in the podcast, adding shutters to a home can make a tremendous difference. And while I’d love to share a large gallery of photos making our case, I don’t have the rights! So, I’m doing the next best thing: Here’s a google image search that will allow you to see exactly what we’re talking about!

Check it out! And we’re betting that if you don’t already have shutters on your home, after seeing those photos, you’ll move that project to the top of your list.

Vinyl Safe Colors

Benjamin Moore’s Revive is available in a wide variety of vinyl safe colors. Check out the full palette!vinyl_safe_colors_revive4

Penetrol Fix for Shutters

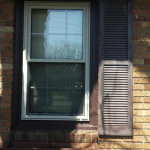
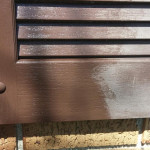
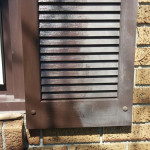
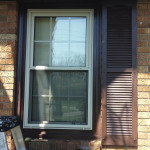
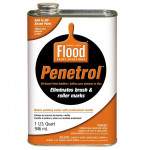
We talked about this at the 21:51 mark on the podcast and if you didn’t hear it, you should listen in to know exactly what these notes refer to. At any rate, I was able to dig up the photos that I took when I applied Penetrol to my shutters early last Spring. The first photo shows the shutter before application–faded and chalky. The next two obviously show the shutter in process. The final photo of the house shows the shutter finished and the surrounding trim cleaned up.

It’s definitely a project to try if you’re looking for a quick and easy way to restore the color of the vinyl. Just be aware, it’s not a long-lasting fix. You’ll typically get anywhere from 6 months to a year out of it. A full paint job is going to last much longer!


Paint Your Front Door and Change the Look of Your Home for $30!

A red georgian door on an ivy covered house

Summer’s getting closer!  And with it, comes a natural desire for many of us to get outside and do some work on our homes.  There’s just something about nice weather, sunny days, warm breezes, and all the beauty of Spring that makes us want to “spruce” up our homes a little bit.

Unfortunately, money is a little tight for a lot of us right now and the thought of dropping a few hundred dollars on a big paint job can be daunting to say the least.

Well, if that sums up you (as it sums up me!), then consider this:  what about a smaller paint project that will still have a huge impact?

I’m talking about your front doors.  Doors can be painted, typically, in a matter of just a few hours.  The cost?  Typically under $30.  The results?  (To use the over-used formula):  Priceless.

A new color on a front door can bring your home from “boring” to hip in just a matter of minutes.  A new color on a front door can give your siding–what you may think of as tired and old–a new look.  A new color on your door will interact differently with your shutters, your roof, your landscaping, everything.

In short, a new color on a front door can give your entire home a subtle new look.  All for under $30 (tools included) and a couple hours worth of work!

So, if you’re looking for a project , but aren’t quite ready to repaint your entire home, give this a try!

Tips for Selling Your Home, Part 2

bigstock-Home-For-Sale-Real-Estate-Sign-11943983_smallerOK, last time, I mentioned something I called The Great Disassociation and how it’s such an important concept when it comes to selling a home.  See, when we live in our homes for any length of time, what typically happens is that we become blinded to the condition of the home.  They’re our homes.  We see them everyday.  And as a result, little things kind of slip by us.

For example, I have a wall in my bedroom–and this is embarrassing to admit–that had a nail hole in it.  I had tried to hang a picture and I put it in a spot I didn’t like.  So, I pulled the nail out, moved the picture and then spackled the nail hole.  Impressive, right?  Well, not so much.  See, that’s as far as I got.

In fact, while that happened over 2 years ago, I just noticed the other day that there’s still a big white spackled spot in the center of the wall that has NEVER BEEN PAINTED!  I’ve left that undone for over two years and I never really even noticed it.  It became the new normal and it never jumped out at me as something to think about doing.  (I told you it was embarrassing).

Another example is this:  my basement has a musty odor in the Spring and Fall.  If I run a dehumidifier, it goes away and smells fine.  However, what usually happens is that we get used to the smell.  We walk into our back entry after a day out and it smells like our back entry.  I don’t even think about it.  But every now and then my mom will stop over.  She’ll walk in and say something like “I should get you our dehumidifier–that way you could clear out that musty smell.”  She doesn’t mean anything negative–she’s just offering her help.  Problem is, she’s offering her help with a problem I didn’t even realize existed.  And it’s because I live there.  I get used to it.  I don’t see it as an area of concern.

That’s what I’m getting at–how we live with certain aspects of our home for so long that we don’t even see them as trouble-zones.  And while we’re living in our homes, that’s not such a big issue.  But when we’re trying to sell our homes, it becomes enormous.  After all, I may not notice the spackle spot on the bedroom wall . . . but new buyers will.  I may not notice the musty basement stink . . . but new potential buyers will.  And who knows . . . those things might be enough of a turnoff to steer those folks away from my home.

So that’s why the Great Disassociation is so important.  It’s all about disassociating yourself from your own home–about forgetting that it’s yours–about looking at it with new eyes–with the eyes of potential new buyers.  Doing this is going to help you spotlight some of the areas that are going to need your attention–areas that should be repaired or attended to before you put your home on the market.

So, to do your best to eliminate these little turnoffs, you first need to find them.  And to find them, you need to look at your house as if it was somebody elses.

Now, that’s not easy to do . . . so here’s what I recommend.  Drive away some night and go out for dinner with your family.  Maybe, if you’re brave, invite an honest and good friend of yours along.  After dinner . . . and here comes the hard part . . . drive up to your home and do your best to pretend that it’s not yours.

That’s right.  Don’t pull into the driveway–because it’s not your house.  Don’t pull into the garage–it’s not yours.  Don’t get the mail out of the mailbox, don’t pick up the newspaper off the sidewalk . . . treat this house as if it’s one you just drove by, saw the “For Sale” sign, and stopped for a look.

Park on the road–where everybody else would park–and get out of your car.  Look at everything–what’s the mailbox look like?  Is it rusting away on the post?  Will you have to replace it if you buy the home?  Will you need to stain the post?

Check out the roof–that’s always one of the first things I look at–what condition are the shingles in?  Does it look like you’ll be replacing it in the next couple years should you make the purchase?

What about the trees in the yard?  Do they look healthy or are they full of dead branches?  And what about the yard?  Is it green and growing or brown and dead?  Is the grass cut or completely growing out of control?

As you walk up the driveway, pay attention to the cracks or the weeds that are growing there.    What about the landscaping in the front?  Is that out of control?  Are the bushes growing like mad or have they been trimmed nicely?  Are there weeds choking out everything else?

Check out the front steps–are they covered with newspapers?  Are they littered with flower pots full of dead plants?  Are they full of cracks?  Is the welcome mat a mess?

What about the front door?  What shape is it in?  Is it rusting?  Is it peeling?  Is it faded and boring?  Could it use a new color, a new paint job?  Are there spiderwebs everywhere?  Dead leaves?

You get the idea.  Do that . . . analyze your home that way . . . and take notes.  Look at it as if you might be purchasing it.  What jumps out as you as a neat feature?  Would it be better if you did x, y or z to enhance it?  What jumps out at you as a big turnoff?  Is there anything that you instantly would have to fix if you bought the home?

After you’ve gone around the outside of the home, it’s time to head inside and do the same thing.  Analyze everything and keep yourself in the mindset that this isn’t your house.  Keep telling yourself that everything you see that’s not perfect is going to have to be repaired by YOU (the new buyer).

Do this walkaround (and through) your home separate from your spouse–and then meet up later and compare notes.  What did he or she see that you missed?

And if you’ve got the guts and a thick enough skin . . . ask an honest friend or two to do the same.  And don’t chew them out when they let you know what they see either.  Ask them to give you their honest opinion of your home as viewed from the road by potential buyers.  Ask them not to sugar-coat anything.  You want the straight scoop–you want to know what they see.

After you’ve done this, take all this information and analyze it.  Some of the things are going to be too big to tackle when you’re trying to sell your home.  As nice as a loft in the garage would be, you don’t need to build one to sell the home.  But, if the front door looks dirty and old and the mat is worn out and the mailbox is rusting . . . well, those are all little fixes that will go a long way towards your goal:  getting people in your house so they can see what’s inside and hopefully fall in love with it.  Think about it.  And give it a try.

What’s Your Home Saying to Potential Buyers?

There’s a house down the road from me that’s for sale (the one in the photo is not it!).  Has been for a long time now.  We walk past it 2 or 3 times a week on our way to a baseball field where we play epic games that usually end in gloating (on the winner’s side) and crying (on the loser’s).

Anyway, we do that 2 or 3 times a week and every time I walk past that house–whether I’m on the way to the field with 2 happy boys, or on the way home with one really happy boy and one really sad one–I take a look.  And every time I look at it, I think the same thought:  “that house sure has a lot of potential.”

And it does.  It’s a big stone house–looks like something out of a fairy tale.  It’s got a lot of character.  It’s near the baseball field (so we could go have our battles EVERY night–hooray!).  It looks to be a 4 bedroom, 2.5 bath home.  (Which is enticing because my home is currently a 3 bedroom, 1 bath home.  And with 5 kids, a wife and myself . . . well, that’s easily 2 bathrooms too few).

So every time I walk past the house, I stop and think about the potential.  But every time I stop . . . I start back up and continue on my way home, pushing any thought of buying that house out of my mind.

Oh, it’s not the price.  In fact, the price started at the top of our price range (still within it, but at the very top) and it’s dropped $30,000 or $40,000 in price since the beginning of the year.  No, it’s not the price.  We could afford it if we wanted it.  And it’s not really the location.  It’s right down the road from our other home and it’s right next to our major evening entertainment–the ball field.  It’s definitely not the size of the home:  all that extra space and the extra bath and a half would be almost perceived as a gift from heaven.

No.  It’s none of those things that keep us away.  None of those things that get our legs moving again after we’ve stopped to “window shop.”

No, what gets us moving again is what’s probably kept everybody else moving as well:  the house gives a bad first impression.

I’ve never seen much of the inside–not up close anyway–but I’ve got a feeling I know what I’m going to find.  See, the outside of a home is a window to the interior.  A poorly maintained exterior is a warning many home buyers heed.

We walk up to this house and look at the beautiful aspects:  the stone walls, the 4 bedrooms . . . the 2.5 baths.  But despite all that, I can’t get past the poorly maintained front door.  The overgrown landscaping.  The rotting and flaking fences.  The windows that are filthy.  The blinds that hang crooked and bent.

The one room you can see from the driveway shows that either there was water damage or the family before had a dog.  A vicious, baseboard-attacking dog who took out his puppyhood rage on the floor trim of that poor little room.

All in all, despite the nice aspects of the house, the obviously visible negative stuff just turns me off.  I’m afraid that something that looks that bad on the outside is only going to be worse inside.  And so, every night that we stop . . . we look for a few minutes and continue walking, shaking our heads . . . unable to muster up the interest to call the number on the sign.

Now, I know this house is owned by the bank (or something).  It’s empty and has been for a while–so I understand some of the reason for the dilapidated, unkempt look of the exterior.  I understand that whoever currently owns it doesn’t want to spend the money or time to keep up on the exterior work.  They probably figure it’s too expensive.

However, I can’t help but think that when we started looking, the house was about $179,000.  If I’m not mistaken, the current price is either $149,000 or $139,000.  It’s dropped anywhere from $30,000 to $40,000 in price and still hasn’t moved.

I’ve written about first impressions here on this blog before.  First impressions can make all the difference in the world when it comes to relationships and new jobs.  They also play a huge role when it comes to selling a house.  Create a great first impression with your home . . . and chances are, even in a down economy, you won’t be sitting on it for too long.  Let the importance of that first impression slip down on your list of “things to do” and you’re going to have a situation like the folks who own that house I walk by a couple times a week:  you’re going to be lowering your price as you try to make people see past the obvious faults.

When you get to that point:  trying to make people see past the faults and focus on the price, you’ve lost your bargaining ground.  You want people to want the house because they HAVE to have it–they see themselves living there and can’t picture themselves living somewhere else.  When that happens, price becomes a secondary determiner.  It’s still important, but it’s not the first thing we check.

When we see a house that shows well, the first thing we do is get out of our car and look around.  We imagine our kids playing on the yard.  We see ourselves snowblowing the driveway in the winter.  We picture cookouts on the grill and all the other fun things that go with life.  After that, we cautiously and nervously approach the little info box, hoping against hope that the house is within our range.

On the other hand, when people see the house I walk past every other night, I’d put money on the fact that the only thing they see or imagine is exactly what I imagine:  a lot of work.  They then probably do what we do and walk straight up to the info box and look at the price.

The big difference between the two scenarios is what happens at the info box:  in the first case, we’re looking at the price, hoping it’s within our range.  Our heart’s beating a little harder . . . were nervous, excited, hopeful. In the second scenario, none of that’s happening.  We’re simply looking to see if the price is low enough to justify any thought whatsoever into purchasing the home.

In the first scenario, if the price is even within $20,000 of your range, chances are you call the realtor–you want to look into it, to dig, to discover if there’s some way you could swing it.  You love the house, you want it.  Or at least you want to look into it further.  In the second scenario . . . if the price isn’t low enough to generate a little interest, you’re walking.  You probably stuff that little info slip back into the box with a laugh, or you bring it home and throw it out.

In the first case, the house sells itself–price is of secondary (though still important) consideration.  In the second situation, the price is everything:  if it’s not low, low, low . . . the first impression of the house doesn’t leave a potential buyer with enough interest to warrant any further consideration.

So all that to say:  if you’re trying to sell your home . . . don’t make that mistake.  First impressions matter.  In the next few posts, we’ll flesh this idea out and I’ll throw out a number of easy, low-cost fixes you can accomplish in a weekend that will help you make sure your house gets people stopping and talking.

Steel Doors Revisited: Surface Prep on a New Door

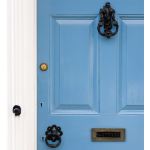
bigstock-Blue-Doors-7834138

Yep. It’s probably a wooden door. But use your imagination…

In an earlier article, we talked about painting your old steel doors.  And while all that information was absolutely flawless (!) in it’s delivery, it’s probably important that we take a second here and attach an addendum.

See, we often talk to people in the store at RepcoLite about their new doors and we usually discover there’s a misconception as to what needs to be done.  Most people tend to think that since their steel or fiberglass door is NEW, they need to do no prep work.  It’s one of the perks of buying a new door, right?

Unfortunately . . . wrong.  New doors, even if they’re pre-primed, need to be prepped correctly.  Even if they’re new, they can be covered with surface contaminants that can affect the adherance of your finish coat.  So, even though your door may be new, it still will need to be prepped correctly before you move on to the paint.

Here are the steps:

  • SCUFF SAND:  Do a light scuff sanding of the door with some 120 – 150 grit paper.  Even though the door is pre-primed, it never hurts to dust over it lightly with some sandpaper to level out any bumps in the primer coat.
  • WASH THE DOOR:  After you’ve sanded the door, be sure to wash over it with TSP (TriSodium Phosphate).  This will remove the dust you created while sanding AND it will remove any contaminants that could be on the surface (body oils from installation, airborne dirt and grime, etc.)

Doing those simple prep steps will help ensure that the paint job on your new door will look great for years to come!