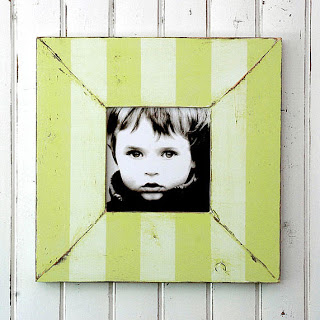
 I found the picture frame at the left when I was cruising around the internet. It was pretty much the type of frame I needed for a particular project I had in mind.
However, there were two problems: first off, the frame I found, the one in the picture here, came in that color green. And that’s the wrong color green. I needed a slightly darker, less olive green than what’s pictured here.
But that’s not important. Color’s not important, because the second problem with this frame was that the asking price was . . . wait for it . . . $120. Yes. Apparently, the child in the photo comes with the frame.
Needless to say, when I saw the $120 price tag, I quite naturally backed off and closed the computer down for fear that I might mistakenly bump a couple of keys and put that obscenely-expensive frame into “my cart.”
A couple days later, I was back, looking for more frames. And I found them. And this time, they were a real bargain: only $40. They looked nice and were mostly (again) what I wanted . . . though the colors weren’t perfect and the price was still (in my opinion) high.
I was just about to toss them into “my cart” when inspiration hit me: I work at RepcoLite. I deal with paint all day long. Why in the world would I buy a frame like that for $120 or even for $40 when I could turn a frame I already own into the same thing for free?
See, I’ve got the perfect frame at home–it’s just got a gold-leaf look to it and I don’t want that anymore. I also have a couple quarts of two different greens at home because I painted a dresser earlier this year for the same room. From there, I put it all together and came up with a great, quick, simple, money-saving project that I’m going to pass along to you as today’s “Quick Hitter.”
What You’ll Need:
- 2 quarts Hallmark Ceramic paint in your desired colors (check your basement shelves or stop out at RepcoLite!)
- 1 can of flat black spray paint
- 1 picture frame
- Sandpaper
- Brush
- 3M Safety Release Blue Painter’s Tape
- Old newspaper or a plastic dropcloth to protect your work area.
How to Do It:
This project is about as simple as it gets. Just start by doing a light scuff sanding of your picture frame (with the glass removed, of course). Just dust over it to take some of the shine down–you’re not trying to bring it down to bare wood!
Once you’ve done that, wipe it clean with a dry rag.
After wiping it down, place the frame on a large sheet of plastic and spray paint it lightly with your FLAT black spray paint. Don’t try to make the first coat cover if it doesn’t seem to want to. Multiple light coats are much better than a single heavy coat.
Once the frame is coated solidly black and is completely dry, take your lighter color of Hallmark paint and apply it to the entire frame. If you need a second coat, apply it when the first coat has finished.
Now, once that initial color has dried (overnight to be safe), take your special 1″ Safe Release 3M Painter’s Tape (you’ll notice it should have an ORANGE cardboard core) and apply it in straight lines down your frame.
To mimic the look of the frame above, just run the tape down the parts or areas of the frame where you want the original color–the lighter color you first painted–to show through. Leave the other areas untaped and paint over them with your darker color. As soon as you’ve finished, carefully remove the tape. You don’t want to pull it too quickly or it could lift your original coat of paint off. (And, just a quick note: that’s why we recommend using 3M’s Safe Release Blue Tape. Any other tape is lightly going to cause problems).
Once you’ve removed your tape (and have let the frame dry), you should have a chic, hip and happening striped frame that you can incorporate into your decorating. If you want to get fancier yet, go ahead and scuff the frame slightly to distress it, bringing out the undercoat of black along the edges.
Conclusion and Suggestions
Now, possibly, this project sounds complicated and long, but let me assure you: it’s not. You should be able to easily accomplish it with a total work time of about 1 hour per frame (at the very most). Doing multiple frames at the same times will also save you a fair amount of time.
And finally, if you decide to give this project a try, go ahead and get creative beyond the scope that I’ve already described: Alternate the color patterns on multiple frames, vary the sizes of the stripes. Run the stripes up and down on some frames and side to side on others. Overall, just have fun with it and realize that with the right paint and a little creativity and energy, you can duplicate almost anything you see at a home decor store–for pennies on the dollar!

