 Have you ever noticed that when you’re sick, everybody is suddenly a doctor. Everyone has an opinion and a cure for what ails you. And while some of the cures are very common–chicken soup cures, we could call them–others are anything but.
For example, one older gentleman I know–who will remain nameless–uses Vicks VapoRub whenever he has a cold.
Now, you may say: “What’s so strange about that? Many folks use Vicks VapoRub when they’ve got a cold.”
And of course, you’re right. Many folks do. But the older gentleman I know uses it (and has recommended that I use it) in a very unusual manner: He eats it. By the spoonful.
Yes. Whenever he’s sick or feels that “under-the-weather” feeling starting up, he heads straight to the medicine cabinet with a teaspoon and downs a spoonful of Vicks VapoRub–that greasy, Crisco-ish paste. Somehow he swallows it down and, “almost instantly” (he says) the soothing Vicks vapors make him feel better.
Needless to say, I’ve never tried it. Nor do I recommend that anyone else ever try this. Yes, my friend is 80+ years old, but I certainly do NOT attribute that age to eating Vicks. I believe he’s achieved a fine old age in spite of Vicks.
At any rate, when you’re sick, everybody comes out of the woodwork with suggestions and recommendations to make you feel better. Some make sense, others are of the “eat-a-spoonful-of-Vicks” variety.
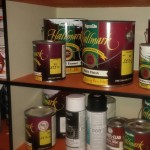
Well, the same thing happens whenever you paint: There are tons of different tips and tricks people recommend for everything from opening the lid to applying the paint to storing it on your shelves. Today I want to focus on several common methods recommended for paint storage but which, in fact, actually do more harm than good.
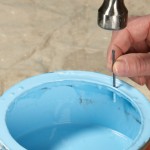
Pound Some Nails in the Rim!
The first method I want to debunk is the Pound Some Nail Holes in the Rim Method. Now, technically, this isn’t  a paint storage tip. It’s actually a painting application tip, but I’m including it here because it can radically affect your ability to store paint when you finish the job.
Now, the point of the method is to pound nail holes in the rim of your paint can so that all the paint that collects there as you paint, actually drips and drains back into the can. Oh, it sounds like a great idea and many, many folks (me included at one point) have tried it.
However, the problem with the method is this: those holes (as well as the process by which they’re created in the rim), can actually damage the rim of the paint can, dramatically reducing the ability of that rim to create a good seal with the lid. That’s just a fancy and long way of saying: pound holes in the rim of your can and you’ll find that you can’t seal the can very well later. Oh, the lid may go on and may look tight, but you’ll often find, when you open it later, that the seal was very poor and your paint has dried out significantly.
So, all that to say: don’t pound nail holes in the rim. Instead, simply keep that rim clean of paint. Or, if you happen to get paint into it, clean that paint out before trying to affix the lid.
Store the Can Upside Down!
 The second method I’d like to address is the common Store the Paint Can Upside Down method. The theory behind this concept is that air will leak in through the lid. If you turn the can upside down, the air will not be able to sneak in and therefore, your paint will stay good longer.
The problem with this theory is that often, the bigger problem in a can–the reason paint can dry out so often in a closed container–isn’t so much that the air is leaking in. It’s because the air’s already in the can when you close it.
If you’ve got a half-full gallon of paint and you pound the lid on and store it–upside down or rightside up–the air that fills up that empty half of the can will start drying the paint that remains. If you leave the can rightside up, this air will cause a thick coating to form on the surface of the paint and on the exposed sides of the can. If you turn the can upside down, the same thing will happen, only on the bottom.
This is frustrating enough when the can is rightside up, but at least that way, the skin is on the surface of the paint and you can see it and easily remove it before you do any stirring or shaking of the paint. However, if you stored the paint can upside down, the skin forms on the bottom side of the can. All the clumpy stuff, the junk, the bad, unusable paint is at the bottom of the can where you can’t see it when you open it up.
At first, you’ll turn the can over, pop the lid, see good paint and think your “upside-down storage” method worked. But when you drop a stick in and start stirring (and break up and spread the clumped paint all through the good paint) you’ll realize the flaw inherent in the system. Unfortunately, by then, it’s not very easy to get the clumped, dried paint out of the good paint without straining it.
So, we recommend simply storing the paint can rightside up, but taking precautions (as we wrote about here) to make sure the can is as full as possible before storage.
Use Plastic Wrap!
The third storage recommendation that is often tossed around is the Place Some Plastic Wrap in the Gallon and then Pound the Lid on method. This is supposed to create an extra seal between the rim and the lid and prevent air from seaping into the can.
That’s the idea anyway, but unfortunately this method usually fails because most often the plastic, rather than augmenting the natural seal between lid and rim actually compromises that seal. With the plastic in there, the lid can’t seal as tightly as it could without the plastic and the result is air leaking into the container.
You’re much better off to do as we recommended above and simply clean the excess paint out of the rim before pounding the lid on. That way you won’t need the plastic at all.
And there you go: 3 different methods recommended on the internet and home improvement shows that just don’t work all that well. For my money, avoid these crazy solutions (and of course, avoid the earlier solution regarding eating a spoonful of Vicks) and stick to the ideas we recommended here!
 The search for the perfect method to properly store paint is one of those Holy Grail-type quests in the painting world. Everybody everywhere has an idea (or two) as to the best ways to ensure that your paint doesn’t dry out in the can as it sits on your shelf.

 I’m a “dreader”. That’s not a word–I know that. But that doesn’t change the truth: I dread things. On a regular basis.
 Not too long ago, the kids helped me do the dishes. That’s cool right? I mean really, you walk into the kitchen after dinner expecting to take on the job and you find 2 or 3 kids there already working, placing all the freshly washed and dried dishes on the counter for my wife or I to put them away. Yes, there’s no way around it: that’s cool.
 Here’s a great idea from a blog we follow called