More Unique Headboards

I’m kind of frustrated.  See, I would love to try some of these headboard ideas I’ve been writing about in my own home–but I can’t.  Or really, to be more accurate, there’s no point.  The beds we already own are adequate and they don’t lend themselves to this project.  So I’m kind of frustrated.  But, I take some comfort in the fact that I can still write about these and get you thinking about them and hopefully convince some of you to give the ideas a try.

Anyway, I’m going to breeze through a few ideas today with only brief descriptions or information.  I think these particular ideas are pretty basic and don’t need too much explanation.

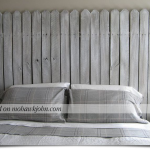
picket_fence_headboard

PICKET FENCE HEADBOARD

It’s just like it sounds.  Buy either a section of Picket Fence at the lumber yard, or build one specifically.  Since you’re using it inside, you could easily build it out of regular pine and then simply prime and paint it for that clean white look.

If you opt for this . . . don’t let yourself leave the motif without completing it.  You’ve installed a picket fence in your bedroom . . . that means you need lots of greenery and “outdoorsy” stuff.  Possibly sky blue walls, possibly (in a kids room) a tree mural.  Maybe you need to wind some “greens” or “vines” through the slats of the fence.  Whatever you do, have fun with the theme and build on it.

CHANGING SCREEN HEADBOARD

Here’s another idea that I think has a ton of potential.  Buy or get your hands on (lawfully, of course!) one of those changing screen things you see at home decor stores and then it’s up to you how creative you can get.

Some of these screens are frames with scrolling and winding metalwork.  That’s fine.  They can be mounted directly behind the bed as is.  I’ve seen other screens that are like the screen on the right.  This one had a uniform brown canvas backer that was removed and replaced with the black and white fabric.

Again, whatever you do is up to you . . . the point is . . . think beyond what you immediately see!

WOOD SHIM HEADBOARD

shim_headboard

I don’t know exactly how this one was done, but it seems to be more about patience than skill.  It’s made entirely of those little wood shims can pick up at any lumber yard.  They were probably sanded (though not necessarily) and varnished when the look was completed.

However they were put together, the look is a weird combination of modern . . . and warm and woodsy . . . you could really go any direction with something like this.

And there you go . . . a bunch of ideas for headboards.  And the point, above all, is to remember to think creatively when a need arises.  When you need a new headboard for a bedroom, you could jump in the car and drive to the home decor store, pick one out, and call it good.  Or, you could get creative.  Maybe you’ve already got everything you need for the perfect piece.

Old Shutters Headboard

Picture from M.E. Beck Design, Inc. at mebeck.com

Picture from M.E. Beck Design, Inc. at mebeck.com

In keeping with some earlier posts about headboards, here’s another idea worth your time and attention:  what about using old shutters?

This idea works especially well if you’re interested in a distressed look (as we see in the picture at the left).  If that’s the look you’re going for, it doesn’t matter if the shutters are old, chipping, faded or even broken (note the second white shutter).  All of those things play into “the look.”

So, whenever you’re wandering through a large flea market or a mission store . . . keep your eyes open for little treasures like these!

VARIATIONS

  • BUILD YOUR OWN.  Now, if you can’t find some plantation shutters like the ones above, don’t worry–you could still imitate the look with some very simple exterior shutters.  And if you can’t find any wooden ones for sale, you could easily build your own.  Just take a look at the picture to the right for inspiration.  The shutters don’t need to be complicated.  Just create some shutters, finish them in whatever style appeals to you and mount them.
  • MIX and MATCH.  Don’t be afraid to combine headboard ideas into one.  For example, an obvious combination would be to start with 1 old window and then install a shutter on either side of it.  Go crazy and complete the look by building a small flower box underneath the window with greens or real potted plants.

Whatever you do, as with all these ideas, have fun.  Don’t jump at the first idea that crosses your mind.  Think about it for a while . . . turn it over in your brain . . . and you’ll be surprised how creative you really can be!

Steel Doors Revisited: Surface Prep on a New Door

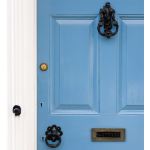
bigstock-Blue-Doors-7834138

Yep. It’s probably a wooden door. But use your imagination…

In an earlier article, we talked about painting your old steel doors.  And while all that information was absolutely flawless (!) in it’s delivery, it’s probably important that we take a second here and attach an addendum.

See, we often talk to people in the store at RepcoLite about their new doors and we usually discover there’s a misconception as to what needs to be done.  Most people tend to think that since their steel or fiberglass door is NEW, they need to do no prep work.  It’s one of the perks of buying a new door, right?

Unfortunately . . . wrong.  New doors, even if they’re pre-primed, need to be prepped correctly.  Even if they’re new, they can be covered with surface contaminants that can affect the adherance of your finish coat.  So, even though your door may be new, it still will need to be prepped correctly before you move on to the paint.

Here are the steps:

  • SCUFF SAND:  Do a light scuff sanding of the door with some 120 – 150 grit paper.  Even though the door is pre-primed, it never hurts to dust over it lightly with some sandpaper to level out any bumps in the primer coat.
  • WASH THE DOOR:  After you’ve sanded the door, be sure to wash over it with TSP (TriSodium Phosphate).  This will remove the dust you created while sanding AND it will remove any contaminants that could be on the surface (body oils from installation, airborne dirt and grime, etc.)

Doing those simple prep steps will help ensure that the paint job on your new door will look great for years to come!

Hallmark Ceramic Matte: A True Story

crayon wallsWell, I’ll start out by admitting that I know I’m probably biased.  I know that I work for RepcoLite Paints and that I’m writing on a RepcoLite Paints Blog and that I’m going to plug a RepcoLite Paints Product.  And I know that all of that makes me somewhat biased.  But as you read this, everytime you start to think that “the guy writing this is just blowing smoke because he’s trying to sell something”, I ask you to refer to the photo at the left.  Whenever you’re tempted to doubt the honesty of this post, check out that picture.Continue reading

Painting a Steel Door

bigstock-Blue-Doors-7834138

Yes. This is probably a wooden door. But we bought the picture, so we’re going to use it! Just use your imagination…

Painting a steel door is one of those projects that can make a big impact on the exterior appearance of your home.  And if you do the project the right way, you’ll be enjoying that color for years to come.

If you’re thinking about sprucing up your front door any time soon, follow these tips and steps to make sure the project goes as easily as possible:

  • REMOVE THE DOOR and THE WEATHER STRIPPING:  If possible, you’ll have your best success if you can completely remove the door from the frame and set it in your garage or your basement on saw horses.  If you can’t remove the door, don’t sweat it–you can still do a good job, though you’ll need to be a little more cautious with paint runs, etc.  Also, many doors allow you to remove the weather stripping.  This is ideal.  Remove it (paying attention to how it will go back on) and store it somewhere safe.
  • REMOVE THE HARDWARE:  Whether or not you can remove the door from the frame, the next step is to remove the hardware.  Remove the hinges, the door knobs, and the kick plates.  You can paint around them or tape them off, but leaving them on makes all the subsequent steps more complicated and more time consuming.  So, remove them if at all possible!
  • SURFACE PREP:  As with any painting project, failure or success is usually determined before you even open a can of paint.  If you’re painting over a previously painted door, you need to make sure that you sand and scrape at all the paint to ensure that what remains on the door is stuck down well.  Sand the door with 120 grit paper (you’re lightly sanding it–not trying to leave visible grooves).  And then, after sanding and scraping, wash the door down well with a solution of TSP (TriSodium Phosphate).  Quick Tip:  When using the TSP, scrub the door down with a 3M Scotchbrite pad (a little green scrubby pad you might use on dishes).  This will serve to dull and etch your previously painted surface and will aid with the bonding of the new paint!
  • PRIME (if necessary):  After you’ve sanded and washed the surface, you should prime any bare metal spots with RepcoLite’s 449 Grey Metal Primer.  This is an oil-based, rust-inhibitive primer, that’s perfectly suited for these situations.
  • BRUSH or ROLL YOUR DOOR:  Either using a high-quality brush or a small, quality 4″ or 7″ roller, apply your paint to the door.  We recommend applying RepcoLite’s Endura Acrylic Latex Paint for the most durable, longest lasting finish.  Work evenly and quickly, starting with the inserts and then finishing up with the remaining flat surfaces of the door.  Apply coats as needed.
  • LET IT DRY and RE-INSTALL:  Let the door dry at least 8 – 12 hours (longer if possible) and carefully re-install it.  UNDERSTAND:  Latex paint will dry to the touch in a matter of hours, but it doesn’t reach it’s full hardness for about 30 days.  You don’t need to leave the door off the hinges for 30 days, but keep in mind that just because it’s “dry” that doesn’t mean it’s as strong or durable as it’s going to be . . . so go easy!
  • RE-INSTALL WEATHER STRIPPING LATER:  If you can leave the weather stripping off for 10 – 30 days, that’d be in your best interests!  As mentioned earlier, the latex paints will dry quickly, but if you close the door and press it against the weather stripping too soon, it’s entirely possible that the paint will peel around the edges when you next open the door!  If you can leave that stripping off for a couple weeks or so before re-installing it, you’ll minimize your risks.

FINAL TIPS and PARTING THOUGHTS

  • COLOR MATTERS:  Dark colors fade quickly.  Red can be especially bad.  Also, reds can cover poorly.
  • NO SHORTCUTS:  One of the worst things you could do when painting a door is try to make a coat of paint cover in 1 coat when it probably needs 2 or 3.  The best advice we can give you on this one is to apply EVEN coats.  If you’re color needs 2 – 3 coats of paint, then resign yourself to applying 2 – 3 coats of paint.  If you try to make it cover by applying it too heavily, you will have all sorts of problems on your hands.  The paint will run and sag; it won’t cure or dry well and you’ll find it sticking to your weather stripping and causing all sorts of other problems!  So, don’t rush it.
  • GIVE IT TIME TO DRY:  Latex paints dry to the touch very quickly, but don’t let that fool you into applying too many coats too soon.  Apply a coat and let it dry for an hour or two before trying the second one.  Sometimes you could apply those coats as quickly as 15 – 20 minutes after each other (it dries that fast), but in the end, you’ll only run into problems.  So give it the dry time the can recommends.
  • LATEX IS BETTER THAN OIL:  Latex Acrylics (like RepcoLite’s Endura) will outperform oil based products.  They’ll hold their color better and they’ll endure the constant expansion and contraction a steel door experiences much better as well.
  • PAINT IN THE SHADE:  Paint when the sun isn’t directly on the door.  And ideally, paint before or long after the door’s been exposed to the sun.  Steel doors will heat up significantly on a summer day and if you get on it and start painting too soon, or when it’s too hot, you’ll have trouble with your latex paint.  It will dry much too quickly and you’ll end up with streaks and roller marks.

I could go on and on, but you get the idea.  This is a project that usually can be accomplished in just a few hours.  It’s not complicated–and if you take the steps we’ve outlined (and check with any RepcoLite store for more information if you have questions) you’ll be fine!

Tri-Fold Door Headboard

In an earlier post, we talked about using a standard paneled door as a headboard.  Here’s another take on the “door as a headboard” idea that really offers you a ton of creative opportunity:  create a headboard from a set of tri-fold closet doors.

Now, admittedly, this is maybe a bit more expensive than some of the other ideas–you would need to pick up a set of doors if you don’t have them–but the project will produce a very unique and interesting result that’s probably worth the expense.

Here’s how to achieve what you see in the picture, as well as some other variations you could try:

Stripes, Stripes, Stripes

As we see in the picture, stripes can create a calm, soothing, clean and somewhat modern feel in a room.  And the good news is that accomplishing a look like this is much easier than you may think.

However, before we spell out the “how-to’s” regarding this project, let me start by saying that the biggest, most important tool you’ll need (besides the doors and the paint) is the right tape.  Trying a project like this with the wrong masking tape is going to be disappointing and frustrating.  So don’t go cheap on the tape if you’re going to try this!  I strongly recommend picking up a role of 3m’s “Orange Core” safe-release masking tape at RepcoLite.  This is a specially formulated “safe-release” tape that will both leave sharp, clean lines while at the same time come off freshly painted surfaces without pulling up the paint.  Using a tape like this will prevent any bleed-through or “bumpy” paint lines.  You’ll get sharp, crisp lines and (trust me) you’ll be happy!

OK, start with the right tape and the rest of the project is easy.

Prime and paint the doors with a white (or the predominant color in your scheme) Eggshell finish.  Preferably RepcoLite’s Hallmark Eggshell.

After the doors have dried for 24 hours, carefully measure off and tape the different section that you want to apply the different color stripes to.

Roll your colors onto these areas using a small roller and allow to dry for 20 minutes to an hour before carefully removing tape.

Continue in this manner, filling in the doors with the differently sized and colored stripes until the doors look the way you want.

Once you’ve accomplish this, let the doors completely dry and mount them.  (Remember this, though:  Latex paint dries to the touch in hours, but doesn’t reach it’s full cure or full hardness until about 30 days later.  This means the doors/headboard won’t be as durable as possible for the first month or so–so go a little easy on them!)

Variations on this One

Don’t stagger the stripes–run them from one end to the other.

Skip the stripes entirely and paint each door a separate color.

Paint the doors a solid, consistent color–all three of them–and then run 1, 2, maybe 3 narrow stripes (1″, 2″ or so) across the doors from left to right.  Clump these narrow stripes or spread them out.

Run the stripes from top to bottom rather than left to right.

Apply wallpaper to the doors instead of paint.

The variations are basically endless.  It’s only a matter of the limits of your creativity.  Above all things:  have fun!