


The following has been adapted from “Ten Tips for Hiring a Painting Contractor” by the Paint Quality Institute.
Have you ever tried to find the right contractor to do some work in your home? Have you ever lived through some of the home-remodel horror stories we hear about from time? I read about one the other day: a couple bought a historical home in a fancy historical section of some fancy little town somewhere–not around here–but still, a nice, quiet upscale neighborhood. They bought a nice house and then hired a couple contractors to come in and do some work to perfect their new home.
Well, they brought one company in to do some work digging out the basement and underpinning the foundation. (Yes, I’m sure you can see where this is going.) This contractor, it turned out, didn’t know quite as much about excavating as he had suggested to the couple. Subsequently, he excavated so thoroughly around the home that one of the basement walls collapsed. Which of course, caused parts of the house to collapse. Which, of course, caused the rest of the house to collapse. Which, consequently, was so catastrophic that it caused parts of a neighbor’s house to collapse. Everybody made it out alright, but what a mess–what a nightmare! And what a way to start a relationship with a new neighbor: “Hi. I’m Tim and this is my wife Alice. We just moved in and knocked our house down on top of yours. Can we use your restroom?”
At any rate, that’s an extreme example, but we’ve all heard about other situations that, while not as horrific, were still horrible, painful and depressing for the folks involved. And because of that, many of us get nervous at the very thought of hiring somebody to do any kind of work in our home. We wonder if we’ll hire the right company. We wonder how we’ll know that the company we do hire is honest. We wonder how we can be assured they’ll do quality work and on and on and on.
Well, because of that, I figured we’d breeze through a great list of tips based on a similar list produced by the the Paint Quality Institute.
So, without any further ado, here are 10 Ways to Make Sure You Hire the Right Contractor:
Number One: PREPARE
Before you sit down with your contractors to talk about the work, sit down with your spouse and compile a list of the work you expect to be done on a given project. This gives you a list of specific items you can hand to each contractor to make sure nothing’s forgotten and also, to make sure they’re quoting on the same work.
Number Two: GET MULTIPLE QUOTES
Don’t limit yourself to working with the first company you contact. Talk to multiple contractors and get quotes from each of them. And don’t be afraid to let your contractors know that you will be getting different quotes. You don’t need to be rude about it, or use it bully someone into giving you a bottom of the barrel price, but it never hurts to be honest and let them know that they should put “their best foot forward” so to speak.
Number Three: ANALYZE THE QUOTES and CLARIFY THE WORK PROCESS
And by “analyze” I don’t mean simply look at the price tag and decide from there. I mean analyze every aspect of the quotes. If one of your contractors gives you a quote that says “Paint Living Room for $400”, you owe it to yourself to dig deeper. Especially if the other quotes came in higher. Make sure you find out what the contractor means when he says “Paint Living Room.” Does that mean 1 coat of paint? Does it mean 2? Does it mean he’ll prep the walls? Fill nail holes? Patch dings? Move your furniture out? Paint around it? Etc. Look at the quotes, and compare the work that’s being done–don’t just look at the price and go with the cheapest.
Number Four: TALK ABOUT TIMING
Before any work starts in your home, make sure you sit down with the contractor and talk about timing. How long will the project reasonably take? When will he be able to start? How long will he work each day? And, most importantly, what happens if the work is not finished on time? Hammer out the solution the contractor will offer if the work takes unreasonably longer than expected. Don’t wait to start talking about this until there’s a problem–that’s way too late. Deal with this ahead of time–before you’ve even hired a contractor–and get it in writing.
Now, with that said, I want to encourage you to focus on my line about the project taking “UNREASONABLY LONGER” than you expected. Problems will arise in almost every remodel project–things you couldn’t have predicted. If your contractor is working diligently through these complications, don’t hold him to unreasonable expectations. Use this concept as a safeguard to protect yourself from a negligent or disinterested contractor, not as a means to wring money out of a contractor who’s doing his/her best in a bad situation.
Number Five: ASK ABOUT THE WARRANTY
Most contractors will warrant their work for about a year or so. Find out what your contractor will warrant and for how long well before you hire him. When your paint has peeled six months after the work was completed is NOT the right time to explore the warranty options. The time to do that is well before any money leaves your hand!
Number Six: ASK FOR REFERENCES
Every good, trustworthy contractor out there will GLADLY supply you with a list of references–names and numbers of folks he’s worked for in the past. And when he does supply you with this list, CALL THE PEOPLE. Just because you’ve received a list of names from your contractor doesn’t mean that those people liked the work she did for them.
Number Seven: PERSONAL APPEARANCES MATTER
In so many other situations in life, we should never judge by outward appearances, but when it comes to business, appearances matter. If your contractor shows up looking like he just crawled out of bed, hadn’t shaved for 3 weeks, and possibly has been living under a bridge somewhere, understand he will likely bring this same level of professionalism to your job.
Number Eight: BUSINESS ETIQUETTE MATTERS
In the same way that personal appearances matter, so does business etiquette. Did your contractor return your calls in a reasonable amount of time? Did she make it on time to all your appointments? Was she professional in speech? In dress? In the manner in which she talked about addressing your concerns? If you run into a contractor who can’t make it on time to meetings, can’t return your phone calls in a reasonable amount of time, and so on . . . I’d run away quickly. If that is the best he can muster when he’s trying to secure your business, how much less is he going to bring when he’s actually got your money?
Number Nine: WHAT PAINT WILL BE USED?
Work out these details ahead of time as well. Some contractors have certain products they want to work with, but typically, you’re going to be much better off (your job will last longer, will apply easier, wash up better, etc.) if you make sure you use high quality (RepcoLite) paint!
Number Ten: PAY NOBODY UNTIL THE WORK’S DONE
Now, this is a no-brainer, but don’t hand over the full amount of money until after you’ve had time to inspect the finished work. Oh, you may need to give some money up front for supplies, paints, etc., but don’t hand over a final check until everything is finished. Don’t do that even if your painter shows up and tells you the “guys will be finished tomorrow and I was just in the neighborhood, could I get the check now?” Nicely and politely say “no.” Even if you trust your contractor. Even if your contractor is your Brother-in-Law. Handing money over before a project is finished is a recipe for disaster. Don’t do it!
And there you go–10, long-winded tips to make sure you end up with the right contractor. Any comments? Any feedback?

 Yesterday, I was sitting in my little cubicle at work, happily typing away on the computer, when I suddenly realized that the other people in the office were talking about me with a salesperson from Wyrick’s Office Supplies. Talking and laughing. Mostly laughing.
 Well, I’ve got a flat tire. Right now. In fact, I’m writing this from the lobby of the tire repair shop. And of course, to be perfectly honest, I’m kind of half-expecting someone to walk over to tell me, “Sir, the tire’s all fixed and ready to go, but we decided to take a look around and noticed that that motor’s leaking all kinds of Chromascopic oils and your Magnesium Regulator is completely empty. On top of all that, your Obstingent Flux Nexometer is completely shot.” (I’m not a car person, so as intelligent as I sound, I just want you to know that I’m making up names…)
 no-brainer, but believe me, people forget this all the time. Repainting and sealing your water stains on the ceiling will be an exercise in futility if you don’t first find the source of the problem and repair it. Get a roofer out to your home if necessary. Tighten your plumbing connections. Install some heat tapes on your roof if the leaks are from ice backup. Whatever you need to do, find the source of the leak and fix it.
 It’s been a while since we tossed up a “quick hitter” project–a project that should take you less than a couple hours and cost you less than $40–so I thought I’d pitch this one to you: painting an accent wall.
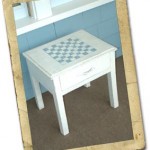
 Painting a checkerboard design on a table is a great project that will infuse your front porch (or wherever) with that old-fashioned, laid- back feeling we all associate with a game of checkers. It’s simple, quick and best of all, will probably cost you less than $20 (including the table).
 2. Paint the Table (if necessary)
 roll of safe-release masking tape available at your local home center or hardware store. Purchase the roll in the width that you drew your squares. (If you drew 2″ squares, go with the 2″ tape, etc.) Tape around the edges of the entire board and then tape off alternating lines and alternating squares (see inset).
 3e touch, or you can leave this part of the project for another day. Just use light pressure with some 150 grit sandpaper and dust over the entire surface of the table. Continue this until the checker board pattern is sufficiently distressed. Wipe the table clean with a slightly damp rag and, when it’s dry, either leave it as is or apply a single coat of a flat polyurethane varnish or a spray lacquer. (Be advised, unless you use a water-based polyurethane or a non-yellowing lacquer, this protective coat will yellow slightly over time.)
 Just before Christmas, my wife and I decided to go through the kids’ toys and get rid of the stuff we didn’t need. With Christmas coming and the inevitable influx of new toys, we figured we’d need to make space. And so we decided to do some heavy-duty toy cleaning. (Which is just another way of saying “we used garbage bags.”)