
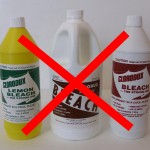
 Well, Spring’s upon us and many of us, because of the rainy start, are still scrambling to get our decks cleaned and protected for the season. If that’s you–if you’re one of those folks looking for a good, dry weekend so you can get your deck cleaned and ready for cookouts and parties, well be sure you read this first. See, one of the tendencies we often notice at RepcoLite is a customer’s desire or plan to use regular household bleach to clean their deck. Since Chlorine bleach does a great job killing bacteria and stuff like that, many of us figure it’ll be perfect for our dirty, moldy or mildewed decks.
But before you go and jump into a job like this, you should be aware that Chlorine bleach has never been proven terribly effective in killing molds on rough, porous surfaces. Also, be aware that it actually destroys
the lignin in your wood deck.
Now, for those of you not quite up to speed on what exactly lignin is, or does, let me explain: Lignin is a naturally occuring “complex polymer that binds to cellulose fibers and hardens and strengthens the cell walls of plants”(1). Basically, when lignin is destroyed by bleach, the way the wood bonds together is disrupted or compromised. When this happens, the wood’s much more likely to exhibit signs of aging, splintering and checking. On top of all of that, Chlorine bleach will effectively remove the natural coloring from the wood of your deck, replacing it with a bland, washed-out appearance.
 Also, not only does Chlorine bleach negatively affect the durability, quality and appearance of the wood of your deck. It also can make your deck restoration project. See, bleach is basically 99% water. And water is largely the reason we see the growth of bacteria and mold on our decks. Now, the nature of Chlorine prevents it from penetrating deep into materials like concrete or wood. However, while the Chlorine won’t penetrate–and instead, just lays on the surface–the water WILL penetrate. And this really only serves to feed the roots of the mold. So, you clean the deck, get it looking great–right away–only to find a few days later that the mold is back with a vengeance. This is all likely to happen when Chlorine bleach is used as a cleaner.
So, with all that said, the answer’s pretty simple: when it comes to cleaning your deck, lay off the Chlorine bleach! Instead, use an oxygenated Bleach cleaner like “Defy’s Safe Oxygenated Bleach Wood Cleaner” available at RepcoLite for $20.95. This powder mix will mix with water to produce 5 gallons of deck cleaning solution–enough to cover 700 – 1000 square feet.
An oxygenated Bleach like Defy’s cleaner will give your deck a clean look without harming the wood, detracting from it’s appearance or endangering the surrounding vegetation. Oxygen bleach give you a clean deck and will not harm vegetation surrounding your deck, which is a huge plus and will save you time from covering your grass and landscaping to protect it. Remember, the healthier your deck wood is, the better the deck’s going to look.
So lay off the Chlorine bleach when it’s cleaning time!

 Spring has finally (hopefully) sprung and with it, so has the exterior painting season. Homeowners all throughout West Michigan are already starting to take a look around their properties, trying to decide what jobs need to be tackled and which ones can wait until next year.
 At first glance, that looks like a $50 savings by going to the cheaper paint. However, if the Endura lasts–as the field tests show it will–at least 10 years before it needs to be redone, you find that the average cost per year breaks down to about $12.60, which actually makes it cheaper in the long run than buying the cheaper paint.
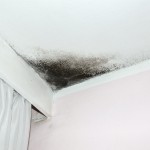
 Mold on a bathroom ceiling is a common problem homeowners struggle with on a regular basis. However, the good news is that while it is common and while it can be a pain to get rid of, it CAN be dealt with–you just need to take the right steps.
 If I say the words “Athens, Greece”, what do you think of?

 I’ve got a number of tubes of caulk in my basement, on my shelves, that are dried out. And that number is 10. Yes. Ten 1/2 full or 3/4 full tubes of caulks of assorted colors and types that have all dried out.